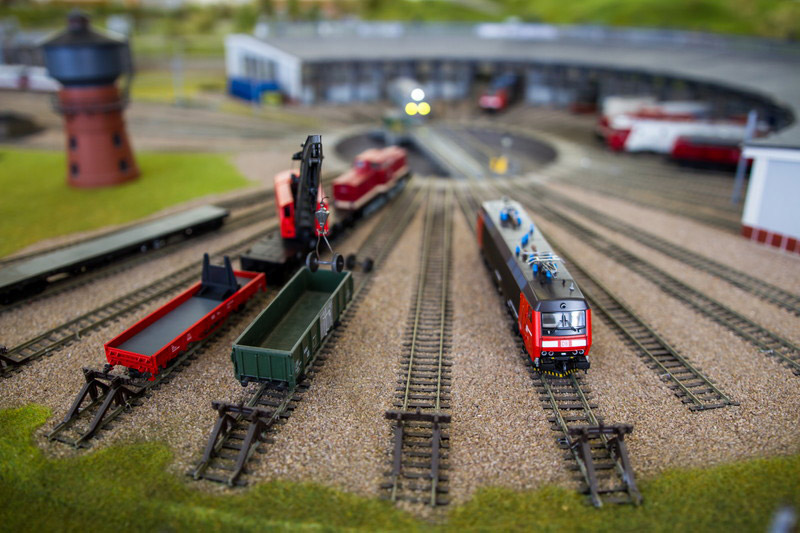
Apr
28
2010
1

8 Tips to Reduce your iStockphoto Rejections

April 28 2010

alex2I know what it’s like to get an image rejected: it’s terrible and if you put effort into your image you feel bitter.

But iStockphoto.com is the leading stock agency today and with the various increase in prices last year it is important for them to ensure that customers get the quality they pay for. That’s good for the buyer, it’s good for iStockphoto and it’s good for you. That of course means, that we contributors have to go through a more rigurous acceptance process.

This blog is mainly about glamour and studio photography and I want to share with you 8 tricks which work well for me. If you follow them chances are you will reduce your rejection rate considerably.

Reducing your rejection rate requires the highest quality at all 3 stages:

  • -During shooting preparation
  • -During the photo shooting itself
  • -During the post-processing

Tip 1: Avoid all possible logos
Logos and brand names are a no-go for stock photography. When buying the clothes ensure there are no logos. If there are logos, identify them all before the shoot. It will help you choose angles and lighting. If you work with a stylist make sure they are aware of this requirement.

Tip 2: Pay a lot of attention to exposure
Many rejections arise directly or indirectly because of bad exposure. Bad exposure has various problems: blown-out highlights, pitch black shadows, dull images. On top of that, when you post-process your images, badly exposed images will cause you to brighten them up or make them darker increasing your chances of creating artifacts. Your exposure has to always be perfect!

Double or tripple check your histogram while you are shooting and/or verify your images on the computer often during the photo session.

Tip 3: Keep an eye on the model’s hair
When photographing in studio hair is difficult to control but if you do not pay special attention to your model’s hair then you are increasing the chances that you will have to post-process the images to improve the appearance of the hair. This post-processing is complicated and increases your images of making mistakes and getting the images rejected.

Typical problems are that small hairs arise wildly in all directions. Or that the hair falls or moves in an unaesthetic way. Speak to your hair stylist about this and have them keep an eye on the hair while you are shooting.

Tip 4: Keep an eye on the model’s clothes

Keep your eye attentive to the model’s clothes. You have the same situation as with the hair. When the model moves you might have creases in the clothes or the clothes might appear unfavorable to the model in certain areas. Maybe the bra or the underwear suddenly become visible. This might cause you to you Photoshop to correct the clothing problems increasing your chances of making mistakes and getting your images rejected.

Speak to your stylist and/or speak to the model, and tell them to pay careful attention to such things. And of course, you too!

Tip 5: Produce sharp images
Images have to be sharp! They do not have to sharp all over, but they have to be dead sharp where it counts. And they have to be sharp straight out of the camera. If you are working with studio strobes then choose a shutter spead between 1/160 and 1/200. If your camera can synchronize with higher speeds, then use even faster shutter speeds.

Make sure you use your best lenses. If you don’t have one then buy or rent one. It is worth the investment

Tip 6: Fill out your model releases very carefully
Every model release must be filled out with extreme care. Make sure that the dates on the release match the dates in your photo’s EXIF file. Make sure the model fills out all fields correctly. Make sure you have a correct and clear description of the shooting. Rejections because of model release problems are frustrating because you cannot always get the model to fill a new one.

And of course you should have one model release for EVERYBODY in the image, no matter how little one can see them.

Tip 7: Only select the very best images for processing
Selecting your best images after your photo session is time consuming but essential. Only choose your very best images. Not only the best ones from a creative point of view, but also the best ones from a technical point of view. They should be dead sharp and have no serious problems with them.

I know how difficult it is when one of your favorite pictures is slightly unsharp. Well, be hard with yourself! And reject that image straight away before you invest time in it and get it rejected by an iStockphoto inspector.

Tip 8: Post-process with care
Photoshop is a marvelous piece of software but can also be the source of lots of rejections. Pay special attention to not creating artefacts when saturating, when brightening or darkenning and image. If you decide to blur the background of your picture do not forget to add 0,1 noise to remove the banding. Speak to other photographers and ask them for photoshop advice.

For the type of photography I do, these are the most essential tips I can give you. Have I forgotten anything for studio and glamour photography? Do you have any questions?

How do you minimize your rejection rates!?

Follow me on twitter, everybody else does :-)

Apr
24
2010
1

Another Way to Use Your Beauty Dish

April 24 2010

Back in January I posted two lighting setups involving only one beauty dish with a grid. You can read them here and here. Last Sunday I used the beauty dish again and mixed it with a snoot to illuminate the background.

I am always surprised how different images can be even when using the same light former. In this setup the beauty dish is above the camera and throws light directly at the model. I have a black background and two black gobos on the left and right to ensure strong shadows and good contrast.

The beauty dish and the grid produce a very focused but smooth light. You can appreciate it on the photo by seeing how nice the model’s skin is even as the light drops strongs shadows.

I use the snoot to make a nice spot on the background. Black backgrounds tend to appear very flat on a photo. If you illuminate them slightly you can create more depth in your photo. There are many ways to illuminate a background and the snoot is one of the simplest yet most effective.

_mg_3624_webLightingSetup

Do you use a beauty dish? Or do you prefer the softbox? Show me some of your lighting setups using a beauty dish. I’d be interested in seeing what other variations are possible!

Apr
22
2010
1

Quarterly Report 2010

April 22 2010

Early January I laid out my goals for 2010. They were ambitious but important to develop my photography. The first quarter 2010 has passed and it is time to have a look back and review progress.

Goal 1: Increase Production by 25%

In the past three months production has been close to zero. In total I produced 9 pictures. If I want to achieve my goal of increase yearly production by 25% I should have produced 34 images. Thats about 75% under-goal. :-(

Goal 2: Sell Exclusively on iStockphoto

All nine pictures are available on iStockphoto. So that goal has been achieved! However my side goal of getting 15% in the Vetta collection was not achieved. None of the nine made it.

Goal 3: Reduce Production Costs by 25%

Due to the lack of photography productions my costs have been zero. This is positive, but expected if I do not produce. Let us see how the remaining quarters evolve.

Goal 4: 50% of my Images will be Produced On Location Outside the Studio

Due to the lack of of productions this goal cannot be measured. I will mark it as not achieved.

Goal 5: Produce Two Photography Workshops in the Area of Glamour Lighting

On the 10th and 11th of April my first Glamour Workshop took place. Preparation for the workshop kept me busy through the whole quarter. So happily this goal has been achieved!

Summary First Quarter 2010

Goal 1: Not achieved

Goal 2: Achieved

Goal 3: Not achieved

Goal 4: Not achieved

Goal 5: Achieved

So let’s keep working!! How is your year going? Are you progressing and improving?

Apr
20
2010
1

Video of the Berlin Glamour Workshop!

April 20 2010

Excuse the shaky scenes but we didn’t have time to set things up properly resulting in some guerilla-style footage!

But you should get a good impression of how much fun we had!

Thanks to everyone!

Apr
17
2010
0
Apr
15
2010
0

5 Models and Two Photoshootings!

April 15 2010

While organizing the big workshop, which took place last week, I knew that my urge to have my own shooting afterwards would be big. So as I organised the workshop I quietly organised my own shooting and that will take place this weekend!

Saturday I will be working with Jennifer Hahn, Constanze Wendt and the model Jessyca. Here two of her pictures (taken from her website http://www.about-jessy.com/)

On Sunday I will be shooting with 4 models individually working on a party flyers series. All four models have a lot of potential and I expect great images. Here a profile of each one:

julia josi
alex marie

By the way, this is my 100th blog post! And on top of that, this blog is exactly one year old. Big thanks to all readers!! :-)

Apr
12
2010
2

Glamour Workshop – More Pictures

April 12 2010

The second day of the event went really well. We worked in a beautiful 1920s hotel, where we had set up three rooms for producing good lingerie photography. The photographers worked in groups of two inside the rooms and received assistance with lighting whenever needed.

Here are some pictures of that day (all pictures by Tom Kettelhut). If you are on Facebook check more here.

Apr
10
2010
3

Glamour Workshop Berlin – First Pictures!

April 10 2010

Today was an intense day, a fun day! The first day of our glamour workshop took place and 12 photographers had a chance to work with 7 models in Studio 67. We had a lot of fun. Pictures are worth a thousand words, so enjoy these (all pictures by Tom Kettelhut)

_mg_0844_mg_0826

_mg_0830_mg_0767_mg_0763_mg_0755_mg_0622_mg_0503_mg_0513_mg_0516_mg_0457_mg_0466_mg_0377

Apr
09
2010
1

Thank You for Voting! Here the results

April 09 2010

The polls closed and thank you to all those who voted! The results speak for themselves and it seems you would appreciate it, if I shared Photoshop tricks on this blog. Most of you seem very generous and would also share your own tricks.

I am going to think about this and decide whether in addition to my lighting schemes, I also share my Photoshop workflow.

Here the results:

Would you share your photoshop tricks with fellow photographers?

you

Would you like it if I shared Photoshop tricks on my blog?

me

Now that I know that many of you would share your Photoshop tricks, my question is: where can I read about them!? ;-)

Follow me on twitter. It’s only a click away!

Apr
05
2010
0

Is Photoshop the Most Important Part of Your Workflow?

April 05 2010

Each photographer has his or her own workflow. For each photographer, the importance of each part of the workflow is different. For some the lighting is the most important, for others its the post processing and for others it might be the search for inspiration and the moment of creating ideas.

For me the post-processing step is most important. It is where I give my photos their character and their essence. It is where I transform a raw photo into the final product, making an effort to make it look as professional and original as possible.

I like sharing my lighting schemes and other tricks with you on my blog, but I have often been asked to share my Photoshop tricks too. This question has made me think a lot and I decided to ask the question back to you. Here are two polls where I would be very happy to see you participate!

Would you share your Photoshop tricks with fellow photographers?

http://twtpoll.com/lub7f8

Would you like it if I shared my photoshop tricks on my blog?

http://twtpoll.com/5t0efx


What is your most important workflow step?

Follow me on twitter. I don’t bite ;-)

Website best viewed with Firefox 3.5.x. Blog powered by Wordpress